
When it comes to mind how to control bandwidth in tp link router, then definitely there is a device connected to your router eating (consuming) all the speed of your internet.
Eventually, the same thing happens to me.
In this post, I explain you all the steps you have to take to control the bandwidth of your tp link router.
Step 1: Log in to your Router.
- On the very top of your screen in the address bar type 192.168.0.1 IP.

- Now you have to log in to your router.
- In username and password type admin( default password of tp link router).

Step 2: Click on DHCP Tab.
The full forum of DHCP is Dynamic Host Configuration Protocol. It helps to assign IP to your devices connected via wifi router to communicate with each other.
Here you get three options: DHCP Settings, DHCP Client List, and Address reservations.

a) DHCP Settings.
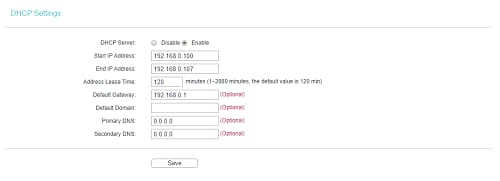
In DHCP settings, you get eight options. Here you can add or change a few things, but to do the bandwidth control on your router, change start IP and End IP.
It’s a kind of local IP pool you have to set up from 192.168.0.100 to 192.168.0.199.
For example, if you have five devices, including your friend’s mobile phone, then you have to input 192.168.0.100 as a start IP and 192.168.0.104 as an end IP.

192.168.0.100 is counted as the first local IP assigned to your devices connects first to your tp-link router.
Here you have to set up the local IP Pool as per the number of devices connects to your tp-link router.
b) DHCP Client List.

In DHCP Client List, you get client name, mac Address, Assigned IP, and Lease timing.
- In the client name, you get the name of the devices connected to your tp-link router.
- In the Mac Address, you get the Mac address ( Media access control address) of the device connected to your Wifi router.
It’s a 48 bits IEEE 802.2001 unique assigned number to your computer.
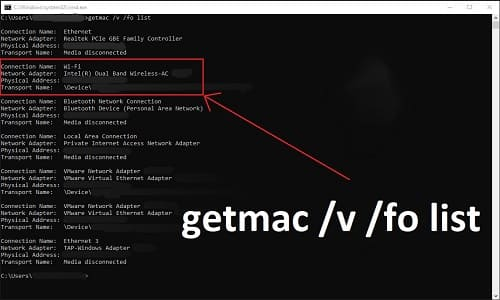
- To find your PC mac address, open CMD. (Press and hold windows icon key and press R).
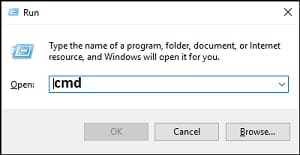
- Type this command: getmac /v /fo list.
- The above command is to check your PC mac address, and if you want to check your Mobile phone mac address, then go into your mobile phone settings > System > About Phone.
- Once you have a mac address list, click on Address Reservation.
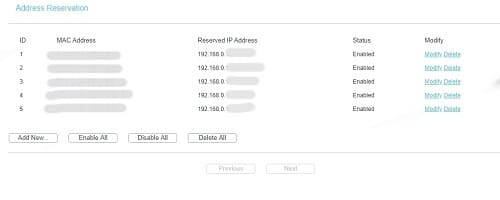
c) Address Reservation.
In Address reservation, add the mac address of the device and Local IP address you want to assign.

By allotting the IP address to the device via mac address. You can control the bandwidth speed of the devices. Along with that, you can keep track of the device.

The Local IP address you assign to the device will remain permanent, and it will not change until you delete it from address Reservation.
Step 3: Bandwidth Control of TP-Link Router.
In Bandwidth control, you get two option Control Settings and Rule List.
a) Bandwidth Control Settings.
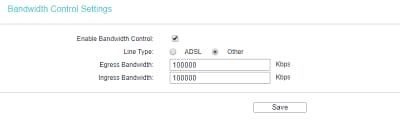
In control Settings, you can enable the bandwidth control to set up the overall speed of the router to the devices.
- Check the box of enable bandwidth control.
- In the line type, select other.
- In Egress Bandwidth (upload speed) and Ingress Bandwidth (download speed) setup 100000 kbps = 100 Mpbs.
- It doesn’t matter what speed you have from the provider. If you are setting up bandwidth control, then 100 Mbps is the max you can setup.
b) Bandwidth Control Rule Settings.
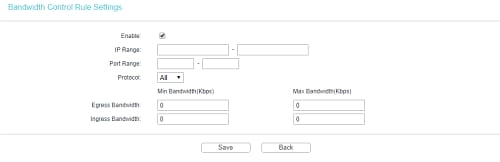
In Rule Settings, click on add or add new to control the bandwidth of the IP address you have assigned via mac address.
- Tick mark the enable box.
- In IP Rang, type the IP Address you have assigned to control the bandwidth speed.
- Leave the port rang blank.
- In Protocol, leave it All.
- In Egress Bandwidth (upload speed), input the speed you like to allocate for the assigned IP.
- In Ingress Bandwidth (download speed), input the speed you like to allocate for the assigned IP.
- Once you are done, click on save, and that’s all you have to do.
I hope with the above steps; you can control the bandwidth of your TP-link. If you need any help, you can let us know in the comment section below.
