
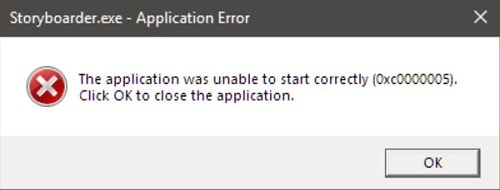
When we get an error like 0xc0000005. We never come to know why we are getting this error in our window computer. It can happen due to application error like application was unable to start correctly 0xc0000005 or due to window error after windows update.
You can search for the solution to this problem and you will get lots of different answers but the most important thing we have to understand, which step will fix your error.
It’s become really difficult to understand even for the technician who gets this error 0xc0000005 first time in their computer.
Before you start reading this article I want you to check in which application you are getting this problem.
For example, if you have two browsers like Fixfox, chrome and You want to go online but chrome browser is showing internet error. On the same time, You have tried the Firefox browser to check the internet and Fixfox working fine.
After testing both of them, now you know where you have a problem. As same, you have to understand your error problem. I have listed every information with you can correlate and fix your problem.
1.Program showing error when open.
If you are trying to open a program and it’s not opening, showing an error that means there is a violation to access error causing a problem in your system.
It’s like a location or files which were not assigned to that program and that program is trying to access that information.
If you are using the program which got hit by Antivirus and you know about the software that it does not contain virus than you have to turn off your Antivirus > after the restart of computer or
If the program contains the virus that you have to scan your computer with anti-virus.
As per my suggestion, you can download two Virus removing software including your own antivirus.
- Malwarebytes: Malwarebytes is an advanced tool which detects and remove virus from your computer. It takes some time to scan your computer but afterwards, it shows you the report of all malware it found.
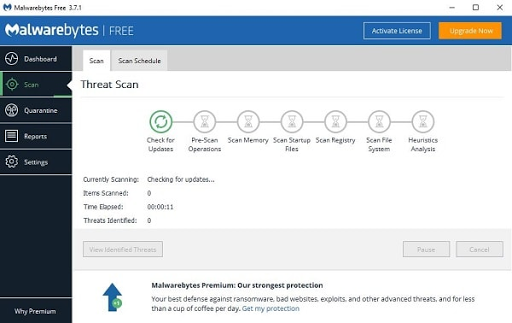
Malwarebytes always remain up to date with the concern of security for their user.
Download Malwarebytes : https://www.malwarebytes.com/
- Hitman Pro: Hitman Pro is the secondary tool which you can to run in your computer to remove infection virus. Hitmanpro is an advanced tool which we use if Malwarebytes cannot able to delete all infection viruses.
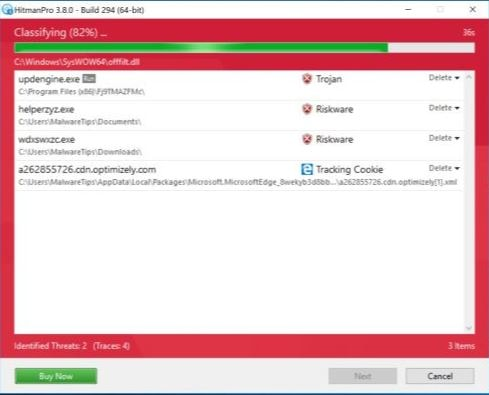
Download Hitmapro Software : https://www.hitmanpro.com/en-us/hmp.aspx
2. Turn off DEP (Data Execution Prevention)
DEP is the windows build in feature which helps the computer to remain protected against the viruses. DEP (Data Execution Prevention) helps the hardware and software to remain protected from harmful virus program to run on a system.
Steps to Disable DEP
- First, you have to be logged in to your admin account.
- On your keyboard press and hold window icon and then press “R”.
- Now you will see Run window pop.
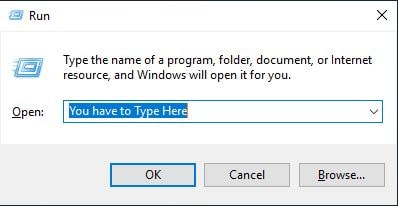
- Type “ sysdm.cpl ” (next to open).
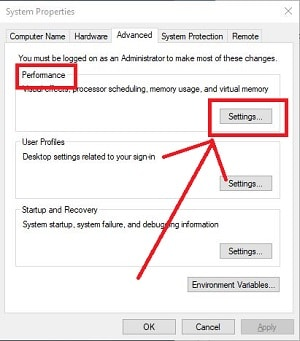
- Now you will get the system properties window.

- Click on “ Advanced ” tab.
- You will get three option performance, User Profiles and Start-up and recovery.
- In Performance Click on “ Settings ”.
- Now you will get “Performance options” window pop up.
- Click on “Data Execution Prevention”.
- Select “Turn on DEP for all programs and services except those I select”.
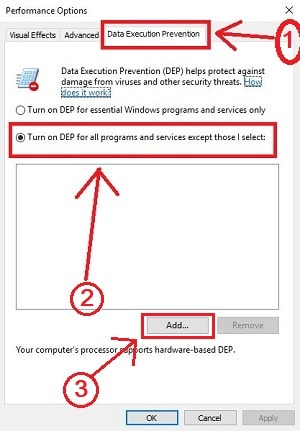
- Click Add.
- Select the file/program in which you have a problem.
- Then Press Ok and Apply.
- It will ask you to restart your computer. Kindly restart your computer.
Now open that program and if it works then do not follow through the next steps.
3. Check Restore Point.
If your computer was working fine two days ago and it stopped working since you have installed new software or updated. On those scenarios, you can check your Restore Point.
Restore point is the option to restore your computer on to the back date when it was working fine.
( Point to Remember: It’s only work if you have created restore point)
It’s really easy to check and restore your computer to the previous date.
3.1. Steps to restore your computer.
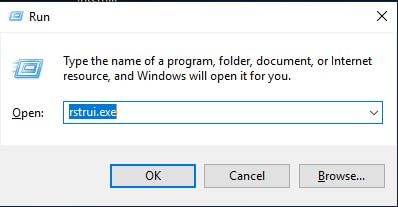
- Press and hold the “Windows” icon and press “R”.
- You will get a “RUN” window.

- Type “rstrui.exe” and press OK.
- Now it will show you two options.
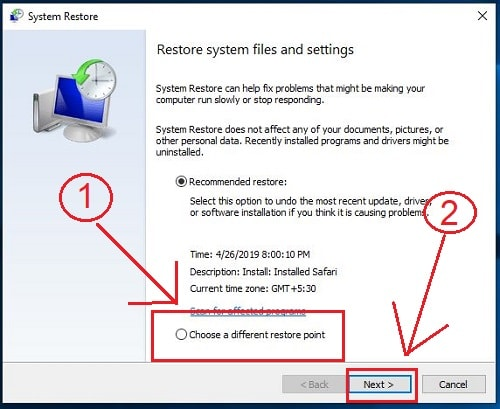
- First “ Recommended restore”.
- Second “Choose a different restore point”.
- Select on the second option.
- Click Next.
- On the bottom right corner, you will get an option to check “Show more restore points”.

- Select your restore point.
- Now click on “Scan for affected programs”.
- You will get the result.
- If the result seems to be fixing than restore your computer back to the previous date.
- Click next and it will start restoring your computer.
4. Run Tweaking/ Fix Registry and DLL Files.
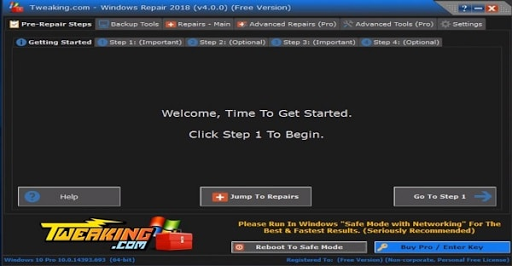
Tweaking software is the open source software to repair windows. It is designed to fix almost 60 per cent of window issue.
It helps you in fixing the error like Registry, Problem in file permission, Window updates problem, Windows Firewall issue etc. It is the most advanced tool used by technicians to fix windows errors and issues.
After downloading and installing the software, reboot your computer into safe mode otherwise, it will take too long to fix the problem and do not forget to back up your Registry.
Download Tweaking Software : Click Here
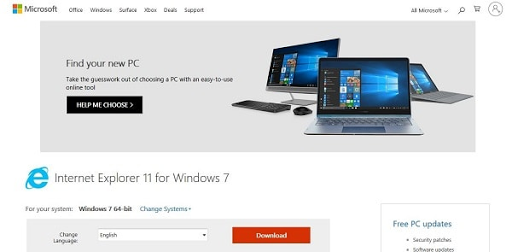
5. A problem in Internet Explorer.
If you are facing problem in internet explorer than I suggest you to update your internet explorer 6/8 to internet explorer 11.
The problems in internet explorer happen when there is some inappropriate tag were not executed properly in HTML.
If your internet explorer is crashing then you have to check your Add-ons installed in your internet explorer. Whenever we download a third party application, it installed some unwanted extension in our internet explorer.
[Point to Remember: If you are installing any program on your computer. While installing that program, if it showing any option to install unknown software or extension then it’s really important to check whether you want to install that extra software or not.]
Now I think you want to know How to uninstall extensions from internet explorer?
- Press and hold windows icon and press “R”.
- You will get a run window.

- Type “inetcpl.cpl”.

- Press ok.
- You will get the “Internet Properties” window.

- There are seven tabs > Click on second last tab” Programs”.
- Now click on “Manage add-ons”.

- On the Right side, you will see all the add-ons.

- Select Add-ons you want to remove.
- Do a right click and disable it.
6. Fix Hardware RAM.

RAM is a hardware component which might cause the error problem in your computer. If you added a new RAM in your Computer and after turning ON your computer you getting this error code then you have to get your RAM diagnosed.
There might be the problem with the RAM slot so, swap the RAM slot once to check if the RAM slot is working fine or not.
Simply shut down your computer and change the RAM. Now boot your computer to check error is still there or it’s been resolved.
And, do not forget to run “Memtest86” Software on your computer. Memtest86 is a software to test your RAM. It tests your RAM by checking the confliction of reading and writing pattern data of Memory addresses.
Download Link: Download Now
7. SFC Scan.
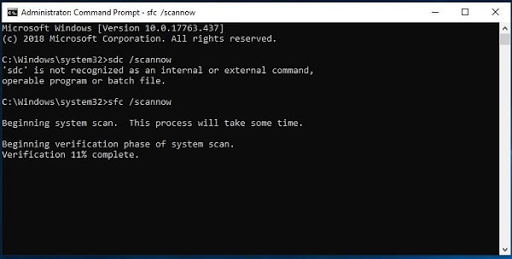
System File Check (SFC) is the one way to fix windows corrupted files which might be causing an error. It scans all the protected files and replaces the saved cache files from corrupted files.
Follow the given step to understand How to run an SFC scan?
- Click on Windows icon ( Left bottom corner)
- Just typing in “cmd”.
- Do the right Click on “Common Prompt”.
- Click on “Run as administration”.
- Type “sfc /scannow” and press enter.
It will start scanning your computer and it will replace the saved cache file from corrupted files.
8. Updated the Driver.
Drivers update is a necessary requirement if your software is not working correctly. By updating drivers we stay up to date with the latest plugins and efficiency of hardware.
You can update your drivers in many different ways, by going to “driver manager” or you can use the software.
We have used lots of different ways to update drivers and I will let you know both options.
- Do a right on Windows Icon ( Left bottom Corner).
- Search for “device manager”.
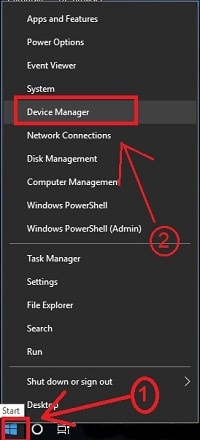
- Click on “device manager”.
- Now you get a list of drivers.
- Do a double click on Disk Drives.
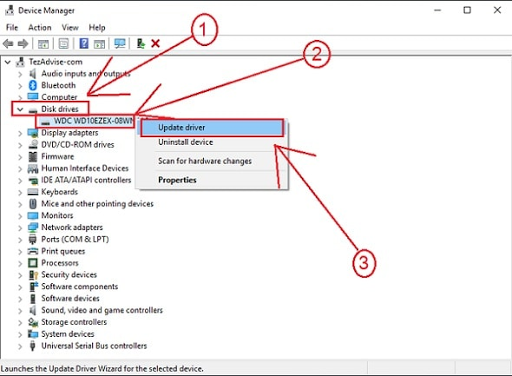
- Now you will get a list, hard driver. ( If you have more than two drives).
- Right, click on the hard drive and you will get all the option.
- Click on “Update driver”.
- Now click on “Search Automatically for updated driver software”.

If this option doesn’t work to update drivers then you can install software to update your drivers.
- Visit drivermax.com.
- Download drivermax software.
- Once it’s downloaded > Install it.
- Now you will get five tabs like Home, Driver Updates, Backup, Restore and Settings.
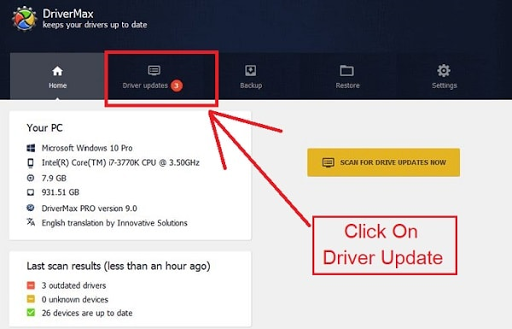
- On the left side, you will get your PC information and on Right side, you will get an option to “Scan for driver updates now”.
- Click on “Scan for driver updates now”.
- It will ask you to activate Drive Max but you can click on “No thanks” and start the scanning.
- After it’s done scanning your computer. It will show you the drivers you need to update on your computer.
- Click on Download and Install.
- Now you are done.
9. Disk Diagnose.
Disk Diagnose is really important to perform after every 4 months on your computer. It helps you to know which part of the disk drive need to repair. Now let’s perform disk diagnose.
How to perform scan disk and repair disk? Follow the given steps.
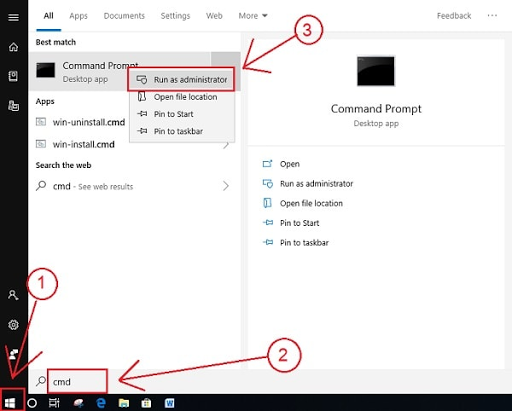
- Click Windows Icon (Right Bottom corner).
- Type “cmd”.

- Right, Click on “Command Prompt”.
- Click on “Run as Administrator”.
- Type chkdsk(space)/scan or chkdsk(space)/volume. Example chkdsk(space)/c.
- First, you have to perform Scan ( it will take few minutes) and then you have to opt for next step.

- Type “chkdsk(space)/f(space)/r.
- It will ask you to restart your Computer.
- Press “Y” and Restart your computer.
